| View unanswered posts | View active topics |
It is currently Sat Jul 05, 2025 7:31 am |
|
All times are UTC [ DST ] |
|
|
Page 1 of 2 |
[ 26 posts ] | Go to page 1, 2 Next |
| Print view | Previous topic | Next topic |
Scene Making Tutorial
| Author | Message |
|---|---|
|
Joined: Sat Feb 03, 2007 7:11 pm Posts: 1496 |
This is a Basic Tutorial on understanding scenes. While the majority of the explanations here still apply, most of this tutorial was meant for Cortex Command circa Build 22 (and other parts are much older, dating back to Build 13).
One can obviously use the map editor included in the game for creation, but this is for those who want more customizability/understanding, or those who haven't purchased the game yet. This tutorial works by giving you a walkthrough of all the variables and their functions. Here's how it goes: 1. Start Out by making the base code .ini For this example we are just going to copy a scene ini from the base and put it in a folder called *yourname*.rte 2. Once you have all the code you need to get started... get started. This defines what objects are going into your scene (not where they are placed) Code: //////////////////////////////////////////////// //Begin list of TerrainObjects AddTerrainObject = TerrainObject InstanceName = Brain Vault // Foreground color bitmap FGColorFile = ContentFile Path = Base.rte/Scene/Objects/BrainVaultFG.bmp // Material bitmap MaterialFile = ContentFile Path = Base.rte/Scene/Objects/BrainVaultMat.bmp // Background color bitmap BGColorFile = ContentFile Path = Base.rte/Scene/Objects/BrainVaultBG.bmp Code: AddTerrainObject = TerrainObject InstanceName = Brain Vault Code: FGColorFile = ContentFile Path = Base.rte/Scene/Objects/BrainVaultFG.bmp Code: MaterialFile = ContentFile Path = Base.rte/Scene/Objects/BrainVaultMat.bmp Code: BGColorFile = ContentFile Path = Base.rte/Scene/Objects/BrainVaultBG.bmp This defines the background. So far, so simple. Next bit of code defines the debris in your ground (gold and rocks) Code: AddTerrainDebris = TerrainDebris InstanceName = Boulders DebrisFile = ContentFile // When loading, 000-001-002 etc is added automatically before .bmp Path = Base.rte/Scenes/Objects/Boulders/Boulder.bmp DebrisPieceCount = 103 DebrisMaterial = Material CopyOf = Stone TargetMaterial = Material CopyOf = Earth OnlyOnSurface = 0 MinDepth = 0 MaxDepth = 300 DensityPerMeter = 1.5 There are 1.5 per 20 pixels. can only go to a depth of 300 pixels. Finally you get to name your scene! Code: AddScene = Scene InstanceName = Grasslands LocationOnPlanet = Vector X = 0 Y = 0 // Gravity acceleration, m/s^2 GlobalAcceleration = Vector X = 0 Y = 19.82 Grasslands is the name. Don't wear it out. Global Acceleration is the Gravity for the Scene (It's usually frowned upon if you change it). LocationOnPlanet is where your little dot on the Planet is (Only If this is a Lua Campaign Mission). Code: // Terrain SceneLayer Terrain = SLTerrain InstanceName = Grasslands Terrain BitmapFile = ContentFile Path = Base.rte/Scenes/Grasslands.bmp WrapX = 1 WrapY = 0 ScrollRatio = Vector X = 1.0 Y = -1.0 BackgroundTexture = ContentFile Path = Base.rte/Scenes/Textures/DirtDark.bmp I'm sure that it uses the same colors as MATs. Background texture file is the background of the terrain once you knock it loose. Code: WrapX = 1 WrapY = 0 ScrollRatio = Vector X = 1.0 Y = -1.0 But you must change the scroll ratios, if you change the wrap variables to get a map in the 2d dimension. Code: ///////////////////////////////////////// // Terrain Debris which is scattered AddTerrainDebris = TerrainDebris CopyOf = Gold AddTerrainDebris = TerrainDebris CopyOf = Plants AddTerrainDebris = TerrainDebris CopyOf = Boulders This also uses the boulders we defined earlier. Code: ///////////////////////////////////////// // Material frostings AddTerrainFrosting = TerrainFrosting TargetMaterial = Material CopyOf = Topsoil FrostingMaterial = Material CopyOf = Grass MinThickness = 5 MaxThickness = 7 InAirOnly = 1 Make the grass target any material, and then you can make the grass anything you want. Min and max thickness is the density (prollabably per meter (20 pixels)) of the foliage or grass. InAirOnly is the variable which makes it appear only in the presence of air (Pink) and the target material. Code: ///////////////////////////////////////// // List of TerrainObjects to apply PlaceTerrainObject = TerrainObject CopyOf = Rocket Silo Location = Vector X = 1357 Y = 693 The y is pixels from the top to the bottom. 0 is top of map. The x is pixels from the loop to the right. 0 is inside loop. Code: PlaceMovableObject = ACRocket CopyOf = Rocket MK1 Position = Vector X = 1605 Y = 855 Team = 0 Setting "Team =" to 1 would make it the enemy Rocket. Same with the brain. As a matter of fact: Lord Tim wrote: You can skip the base placement phase by putting in brains for both players in the scene.ini. Code: AddBackgroundLayer = SceneLayer InstanceName = Middle Layer DrawTransparent = 1 WrapX = 1 WrapY = 0 ScrollRatio = Vector X = 0.25 Y = 1200 BitmapFile = ContentFile Path = Base.rte/Scenes/Backdrops/Middle.bmp AddBackgroundLayer = SceneLayer InstanceName = Clouds Layer DrawTransparent = 1 WrapX = 1 WrapY = 0 ScrollRatio = Vector X = 0.02 Y = 2400 BitmapFile = ContentFile Path = Base.rte/Scenes/Backdrops/Clouds.bmp AddBackgroundLayer = SceneLayer InstanceName = Sky Layer DrawTransparent = 0 WrapX = 0 WrapY = 0 ScrollRatio = Vector X = 640 Y = 1200 BitmapFile = ContentFile Path = Base.rte/Scenes/Backdrops/Back.bmp Default is Rocks from the Horiz-Land scene. 3. Now that the Explaining is over we can start making the stuff in the map. MATS: 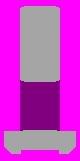 This is an example of a MAT (Material file) that you might find. Grey = Concrete Purple = empty space that dirt doesn't go into (Air) or empty space. Also prevents debris when used in terrain. Pink = is completely empty space. or Air. These are all of the things needed to make bases so this should be sufficient. See bonus for custom MATS. Contours/Map MATs Copy a map that has already been made like Grass Lands or Horizland. And make the open air all that hot pink color. And draw your own map. You can use custom materials by using the method below. And make sure to use RLE compression otherwise errors will befall you. But if you use paint and copy someone else's map for colors and stuff, use that image and redraw terrain for your own uses. That way it will maintain RLE compression. Or you don't need it; all you really need is the palette. Blah: http://www.google.com/search?q=RLE+Compression Tip: Make it look natural not just a map made of topsoil. 4. LUA! I'm sure this is the part you have all been waiting for. Here's how to incorporate a written Lua script into your scene (not how to write lua, silly!) Add your .lua file into your scene folder, and at the end of your *Scene Here*.ini add: Code: AddActivity = GAScripted PresetName = *Your Scene* SceneName = *Your Scene Again* ScriptFile = *Your Mod*.rte/*Your Lua*.lua InCampaignStage = 1 // <-- Critical That you have this part. It needs to be set to one. LuaClassName = *Whatever LuaClassName you used in the .lua file* TeamCount = 2 // <-- Probably always 2 PlayerCount = 1 //Change to How many players you intend to have use this map. TeamOfPlayer1 = 0 // Player 1's Team (Red) TeamOfPlayer2 = 1 // Player 2's Team (Green) You also need to change the "Location on Planet Vector" at the beggining of your scene to where you want the little dot on the planet to be located. Now you can mess with your Lua file, which is a whole 'nother thing. BONUS (Not Sure if this works anymore): To make custom MATS you can make a MOSRotating that is made out of custom material the let loose on a map. Wait till' it becomes static/terrain and then press "Ctrl+m" twice. Then look at the color of your object. Then press Print Screen. Go into paint and take the color of the object and paste it into your MAT. Now you can make fully custom terrain objects. Happy map making! Last edited by zalo on Wed Sep 26, 2012 2:53 am, edited 7 times in total. Disclaimers on validity in this day and old age. Unstickied. |
| Thu Jun 28, 2007 5:31 pm |
|
 Joined: Fri Apr 27, 2007 4:55 pm Posts: 1178 Location: America! |
Very good. I hope more people will start making maps now. This will definitely help.
Sticky nowz. |
| Thu Jun 28, 2007 7:46 pm |
|
 Joined: Sat Dec 30, 2006 11:15 pm Posts: 281 |
Sticky. Now. Plox.
Kudos to you, good work! |
| Thu Jun 28, 2007 11:07 pm |
|
|
Joined: Mon Dec 04, 2006 3:34 am Posts: 2378 |
This is what you don't want to do :
|
| Sat Jun 30, 2007 6:16 am |
|
|
Joined: Sun Jun 24, 2007 6:13 am Posts: 505 |
Lolz, se yoo.Random thing?
|
| Sat Jun 30, 2007 6:57 am |
|
|
Joined: Mon Dec 04, 2006 3:34 am Posts: 2378 |
Yes, that is the result of random test 1.
|
| Sat Jun 30, 2007 6:58 am |
|
|
Joined: Sun Jun 24, 2007 6:13 am Posts: 505 |
Must show me you wais!
|
| Sat Jun 30, 2007 7:03 am |
|
 Joined: Mon Jul 02, 2007 4:04 pm Posts: 47 Location: In a dark corner, eating fried chicken... |
How do you actually put objects in? Like I made a bunker, but I have no idea how to get it into the scene. I've looked at some other scenes' coding, but I haven't found any filepaths that lead to the bunkers...
Actually, I just looked at the coordinates marked in the code for 'CBunker', and it IS where it placed a bunker on the map, only it's a bunker the person made and saved in their file, and they don't have a filepath that shows where the bunker is saved. HELP! |
| Wed Jul 04, 2007 8:21 pm |
|
|
Joined: Wed May 30, 2007 6:37 pm Posts: 50 Location: capdenac (12) & Roubaix (59) - FRANCE |
objects like bunkers are defined generally in another file than the level file un base.rte. personnally, I define them before the code of the scene in my .ini .
here is how a map object code looks like: Code: AddTerrainObject = TerrainObject InstanceName = bunker right // Foreground color bitmap FGColorFile = ContentFile Path = WW2bunkerz.rte/objects/bunker_foreground_R.bmp // Material bitmap MaterialFile = ContentFile Path = WW2bunkerz.rte/objects/bunker_mat_R.bmp // Background color bitmap BGColorFile = ContentFile Path = WW2bunkerz.rte/objects/bunker_background_R.bmp |
| Wed Jul 04, 2007 8:36 pm |
|
|
Joined: Mon Jul 02, 2007 4:04 pm Posts: 47 Location: In a dark corner, eating fried chicken... |
So I put that in my 'Scenes' file?
Wait, how do I specifiy X and Y coordinates? EDIT: Nevermind, I looked at your WW2 bunker scene and checked it out from there. Thanks! |
| Wed Jul 04, 2007 10:38 pm |
|
 Joined: Mon Jun 18, 2007 8:03 pm Posts: 77 Location: strongbadia |
lucky, mine didnt even work
|
| Mon Jul 16, 2007 7:38 pm |
|
|
Joined: Fri Apr 27, 2007 4:55 pm Posts: 1178 Location: America! |
This can be updated for build 15 by adding that Mother Brain has been changed to Brain Case, and that you can skip the base placement phase by putting in brains for both players in the scene.ini. Not much else has changed.
|
| Sat Jul 28, 2007 9:50 pm |
|
|
Joined: Sat Feb 03, 2007 7:11 pm Posts: 1496 |
I'll just quote the second part of your sentance, and update the rest.
|
| Sun Jul 29, 2007 1:19 am |
|
|
Joined: Sat Feb 03, 2007 7:11 pm Posts: 1496 |
Gave it a slight update.
|
| Sat Mar 21, 2009 12:37 am |
|
 Joined: Wed Jan 14, 2009 7:12 pm Posts: 1525 Location: In between your sister's legs, showing her how to use a... PS3 controller! |
Anything a mac user can use to make a map? If I try to make it with gimp and in pallette, the 'transparent' pink turns into maroon. Any other mac compatible paint programs for the MATs and The backgrounds and so on/so forth? And also, can I make bunker modules roughly based on this, since the MAT system for both is the same?
|
| Sat Mar 21, 2009 9:52 pm |
|
|
|
Page 1 of 2 |
[ 26 posts ] | Go to page 1, 2 Next |
|
All times are UTC [ DST ] |
Who is online |
Users browsing this forum: No registered users |
| You cannot post new topics in this forum You cannot reply to topics in this forum You cannot edit your posts in this forum You cannot delete your posts in this forum You cannot post attachments in this forum |